Showing posts with label computer. Show all posts

Tuesday, 20 November 2012

Download Stardock CursorFX Plus 2.01 Full Version With Patch


Stardock cursorFX adalah software yang berfungsi untuk membuat tampilan cursor yang kita miliki menjadi lebih keren atau. Sebenarnya startdock cursorfx bukanlah software yang baru karena stardock cursorfx ini sudah sangat lama namun tetap asik digunakan.
Pada stardock cursorfx juga terdapat banyak pilihan cursor yang membuat kita tidak akan pernah bosan karena kita bisa mengganti cursor yang kita gunakan seminggu sekali, sebulan sekali atau sehari sekali dan bahkan semenit sekali juga bisa kalau sahabat kurang kerjaan ganti cursor dalam waktu semenit.
Sekarang saya tidak akan jelaskan panjang lebar karena lebih baik kalau sahabat haramain software peraktekkan sendiri langsung.

Screenshot :


Bagi yang ingin mendownload, silahkan download pada link dibawah ini.


Semoga bermanfaat.

Saturday, 17 November 2012

MRAM: Teknologi Terbaru Memori Komputer, 10 Kali Lebih Cepat dari RAM

Kecepatan komputer selalu didambakan oleh siapa saja. Berbagai usaha dan penelitian terus dilakukan untuk meningkatkan kemampuan komputer. Beberapa waktu yang lalu super komputer tercepat di dunia telah hadir untuk membantu militer amerika melakukan perhitungan. Kini giliran sebuah teknologi di bidang Memory komputer.


Sebelumnya Anda pasti pernah mendengar istilah RAM (Ramdom Access Memory) untuk menyebut memory komputer. Memory RAM ini memiliki berbagai jenis mulai dari EDO RAM, DDR1, DDR2 dan beberapa jenis lainnya.

Namun ternyata RAM saja elum cukup untuk memuaskan kebutuhan manusia akan tuntutan kecepatan. Oleh karena itu, Fisikawan dan Insinyur Jerman mengembangkan sebuah jenis memory baru.

Memory tersebut diberi nama Magnetoresistive Random Access Memory (MRAM), memory ini bukan hanya lebih cepat daripada RAM tetapi juga Lebih hemat Energi. Kehadiran MRAM sepertinya akan meningkatkan perkembangan mobile computing dan level penyimpanan dengan cara membalik arah kutub utara-selatan medan magnit.

IBM dan beberapa perusahaan pengembang yang lain berencana menggunakan MRAM, MRAM ini akan memutar elektron-elektron untuk mengganti kutub magnet. Hal ini juga dikenal sebagai spin-torque MRAM (Torsi putar MRAM) teknologi inilah yang kini sedang dikembangkan oleh para fisikawan dan insinyur Jerman.

Dengan membangun pilar-pilar kecil berukuran 165 nano meter, akan mengakibatkan magnet variabel pada atas lapisan akan mengakibatkan arus listrik mengalir dari bawah ke atas dan akan memutar posisi elektron. Medan magnet ini akan berubah dan hanya membutuhkan sedikit waktu untuk merubah kutub medan magnet ini. Kemudian kutub utara dan selatan akan bertukar.

Yang pasti, kecepatan MRAM mencapai 10 kali lipat kecepatan RAM. KEcepatan ini masih bisa terus dikembangkan dimasa depan.

Teknologi Komputer Generasi Terbaru

Info menarik buat sobat pecinta teknologi terbaru. Dengan diluncurkannya komputer desktop mini terbaru Acer yang diberi nama Revo 70, membuktikan bahwa pada tahun 2012 ini teknologi akan lebih berkembang dengan pesat lagi. Acer Revo 70 merupakan perangkat komputer generasi terbaru yang sebentar lagi bisa dimanfaatkan oleh sobat diseluruh dunia. Acer Revo 70 memiliki dimensi ukuran 209.89 x 209.89 x 35.35. Perangkat yang digadang-gadang sebagai jenis komputer terbaru ini menggunakan tenaga prosesor AMD E-450 dual core yang memiliki dua Bobcat cores 1,65GHz serta Radeon HD 6320 graphics.

Untuk kinerja lain sobat tidak perlu khawatir, karena Acer Revo 70 didukung oleh RAM 2GB dan berjalan pada platform Windows 7 Home Premium 64-bit. Acer Revo 70 memiliki HDD sebesar 500 GB. Selain beberapa fitur yang telah disebutkan diatas, fitur lain dari komputer generasi terbaru ini diantaranya Gigabit Ethernet, multi-in-one card reader, enam USB 2.0 ports, 802.11 b/g/n WiFi, plus D-Sub, HDMI outputs, VGA port, audio jack, SD card, dan yang terakhir Acer Revo 70 memiliki berat sekitar 1 Kg yang membuatnya dapat dengan mudah dibawa kemana-mana.


Meskipun Acer Revo 70 dilengkapi dengan beberapa fitur menarik seperti diatas, ternyata generasi komputer terbaru ini juga memiiki kekurangan. Karena Acer Revo 70 belum dilengkapi dukungan USB 3.0 seperti halnya perangkat sejenis berbasis AMD.


Menurut kabar, harga komputer generasi terbaru Acer Revo 70 ini sekitar $384 (Rp 3,5 Juta).

Thursday, 31 May 2012

Website Anti Pencurian Telah Diluncurkan

Maraknya kasus pencurian dan penjualan barang curian melalui internet ternyata mendatangkan sebuah ide untuk membuat website anti maling. Website yang bernama StoleMe baru saja diluncurkan pada 27 Mei 2012 kemarin. website ini bertujuan untuk membantu memerangi pencurian dan penjualan barang curian melalui internet.


Cara kerjanya bagaimana?

Website ini mengundang setiap orang untuk mendaftarkan barang-barang mereka yang hilang atau dicuri orang beserta fotonya. Setelah terdaftar pada StoleMe, maka akan masuk list barang ilegal. Sehingga orang yang akan berbelanja barang secara online dapat mengecek di situs ini sebelum melakukan transaksi. Dengan begitu penggua akan terhindar membeli barang curian.

StoleMe bekerjasama dengan Serial Number Asset Partnership (SNAP), yaitu layanan yang memungkinkan seseorang untuk membuat dan menyimpan daftar barang dengan nomer serial secara gratis.

Meskipun tidak serta-merta menghapus aksi pencurian, tapi adanya situs semacam ini patut diapresiasi sebab sudah ada upaya positif untuk memerangi tindak cybercrime. 

Bagaimana dengan Indonesia?
penasaran ingin melihat situs StoleMe ? klik saja www.StoleMe.co.nz

Sunday, 22 April 2012

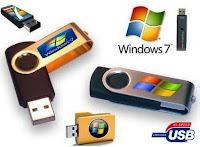
Install Windows 7 With Falshdisk

How To Install Windows 7 with a stick.


Maybe my friend is no stranger to listen to the words of people about How To Install Windows 7 with a stick. But my friend does not know how or maybe my friend does not want to know, which is important atai laptop netbook OS already installed his friend. Need friend know, science is very expensive you know, it emang bener. Well, of course, especially for my friend who has a netbook or laptop, it's good to know How To Install Windows 7 with a stick. This is very important, considering the money we spent if the OS is broken, but only takes a few minutes to install the OS on a netbook or a laptop, depending on the computer spec.
HOW TO INSTALL WINDOWS 7 WITH FLASH


This method is actually used for the netbook with no CD or DVD-ROOM, but the use of flash is much easier and can reduce the risk of failure in the installation process. Although we have been there on PC DVD-ROOM, no one we use for installation Flshdisk because in addition to more convenient and simple, the risk of failure we can also minimalisirkan.

However, before I will briefly describe the advantages and disadvantages of windows 7:
Advantages:

1.The boot / shutdown faster
2.Power consumption CPU, hard disk (HD) and system memory required fewer service
3.Prefetching optimizes both for HD and SSD
4.Better view in terms of three prominent demensinya
5.Features sekurity really tight.

Weaknesses / Cons:

1.Some applications can not operate on Windows 7
2.Bug in Windows Media Player 12
3.There is hardware that can be immediately recognized in Vista, but not in Windows 7
4.Difficult to force the software that previously could be forced to install on Vista, also installed in Windows  XP

Well, if my friend already knows everything, then we proceed to the installation phase of Windows 7 OS.

The first step is to do my friend Download : Tool Install Windows 7 Via Flashdisk

Needed for the next Install Windows 7 via flash are:

1.FlashDisk with a minimum capacity of 4 GB depending on who you use windows 7.
2.Master Windows 7
3.Software WinToFlash.
4.ROOM DVD as a media master copy of Windows 7. [Not optimal]

Furthermore, the process of making a bootable Windows 7 USB Drive can be started with the following steps:

1. Insert your Windows 7 DVD
2. Open the Windows WinToFlash 7.rar and click on the file 2x WinToFlash.exe
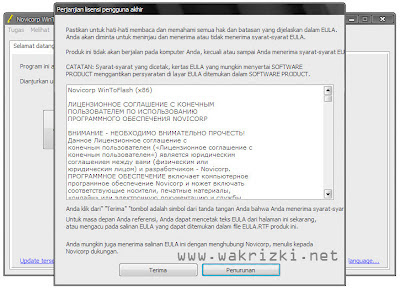
3. Next will come out look like below and click Accept

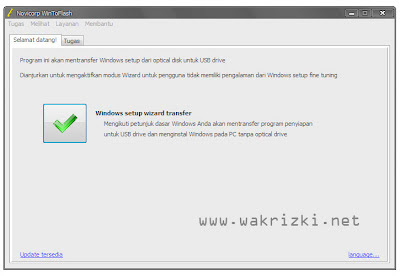
4. In the view below please click the button " Checklist "Windows setup wizart transverse

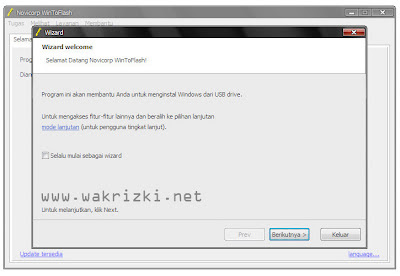
5. In the view below please click the " Next » "

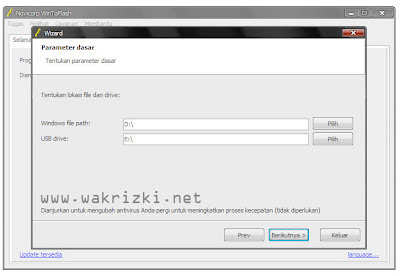
6. In the view below, there are two options:
  • In the Windows file path please select the source OS Windows 7 
  • On the USB drive please select FlashDisk to be used for the installation of OS Windows 7 
7. After that click " Next » "

8. Next select accept the terms and click continue.
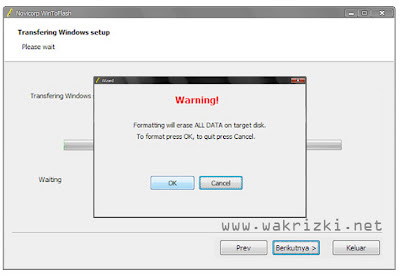
9. If there is a warning to FlashDisk format and click Ok

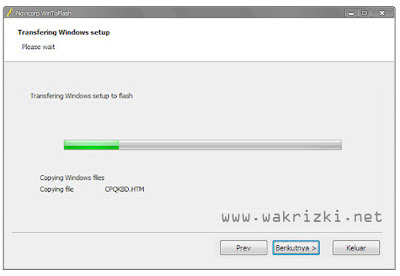
10. WinToFlash will transfer the installation file to FlashDisk windows and it was rather a long process so be         patient waiting for him. After the transfer is complete click the Next and Exit

Early stage to make a bootable Windows 7 USB drive we've done, then we will install Windows 7 with a stick as a device.

HOW TO INSTALL WINDOWS 7 WITH FLASH 

1. 
The first step you should do is make sure my friend from my friend in the computer BIOS boot setting for 1st Boot Device options are Removable Dev. or USB. Drive . How, when the computer has restarted and we will come back to life, immediately press the Delete and the tab Startup 1st Boot Device to select Removable Dev. or USB. Drive . After that press the F10 to save and exit. Not all PC or Netbook have to do the settings like this. Most Netbooks now be automated if we plug in a USB Boot. 

2. Then press any key to boot usb.
3. You should see the image as below:

4. Select Indonesia on  Language, time, currency, and location

5. Press the Install Now

6. Wait a few moments of this process.

7. Check the I accept the license terms for the approval of the use of windows 7 and then click Next

8. Just select Custom (advanced) to select the drive where Windows 7 will be installed

9. My friend can set up partitions on the drive at the same time this step, I recommend at least 2 buddies divide the hard disk drive, one to drive for windows 7 (C) and one drive for data (D) by selecting the drive option, or just press the next will mate with the assumption partition the hard disk after installation of windows 7 is complete.

10. Wait until the process is complete


11. Windows will automatically restart.

12. After the restart will appear below the image.

13. Wait for the process of setting up the services are just a few moments.

14. Installation will proceed automatically.

15. Enter your User Name and Computer Name mate at will.

16. If you need to type the password passtwordnya 2 times or empty it if my friend does not want mempassword user friend.

17. Enter the product key serial number windows 7 activation friend or leave blank to delete it after installation and ceklisnya.

18. Choose the level of security protection from Microsoft.

19. Set the time zone buddy (for Indonesia +7 from GMT).

20. Set the type of network buddies are using. (If connected to the internet)

21. Wait a few moments to set up a configuration that has been my friend set up.

22. Congratulations, pal windows 7 ready for use.
Hopefully this short tutorial on How To Install Windows 7 with a flash is useful for readers pal.
Source-komputer.com tips

Friday, 20 April 2012

BIOS Beep Code and How to Solve Problems

BIOS stands for Basic Input output, the system is designed for the first time once run by the PC is turned on. Initial function of the BIOS is to identify, test, and initialize the hardware installed on the PC such as VGA Card, CD / DVD ROM, hard disk, memory and other hardware on the computer. When the computer is turned on, the computer will play a single beep (in some computer with the type of BIOS may beep twice) and continue with the normal process, but if there is a problem in computer hardware, the bios will play the sound bib as error codes, the number of long or short sound and the sound of bib is a hardware error codes from the installed on the computer. BIOS is most often used is AMI BIOS, AWARD, IBM and PHOENIX.
The error code in the BIOS is characterized by long or short beep or a combination of sounds.With the software "Beeb Rizone Viewer" you can easily figure out the problem on the computer hardware to listen to the beep in the BIOS. Software Rizone Beeb Viewer is free software and software-compatible. The software is portable, contains complete information about the meaning of the Beeb sound on your computer and there are also several types of bios that usually circulate for several types of motherboards.
You can download the software here first Countermeasures If you make Is Computer Beep Codes: If the sound is heard, meaning there is an error after adding new hardware Unplug the hardware to determine the cause of the problem. If after removing the hardware and your computer is working normally, it means that your computer is not compatible with the hardware. Release, the CD / DVD, floppy disk or USB (if any) of the connection to the motherboard and then reboot your computer, if you no longer hear a beep, connect one by one device and boot your computer again. If when you install the sound device bib on when the computer is booted, this indicates the equipment was damaged, try doing the repair (service) or replace with new. 
Make sure all the fans on the computer running well. If the fan fails to work on your computer can lead to overheating (processor hot). Fan fails to work can cause the computer can not reboot. Remove the card any card that is installed on the computer, such as video card, LAN card, sound card or other and put one by one, until you find a damaged card. If all four of the above does not work check the power supply or motherboard, there is the possibility of a weaker component. If after doing all the above methods the error still appears, perhaps the motherboard, PSU, RAM or VGA cards on your computer one of them is damaged, you must replace the component or bring your computer to the service

Monday, 16 April 2012

Computer Dictionary

APPLICATION: software used to perform specific tasks, such as performing calculations accounting, word processing (writing letters, agreements, etc..), Or drawing (graphic nature of work).

ASCII: American Standard Code for Information Interchange. Standard code used to represent text in computers dalri or to exchange text between computers one with another computer. ASCII consists of 255 code into a text representation of all the characters and some non-printing (control) characters.

ASSEMBLY LANGUAGE: The language of low-level computer programming. Assembly language to interact directly with computer hardware.

BASIC: Beginner's All-purpose Symbolic Instruction Code. High-level programming language. In 1964, John and Thomas Kurtz designing Kemeney BASIC as a programming language that is easy to learn. Because of its simplicity, BASIC programming language was quickly accepted as the microcomputer.

 BENCHMARK TEST: a series of tests performed on the system or computer software fatherly measure performance compared to systems or other similar software. 

BIOS: Basic Input-Output System. Part of a particular operating system, such as CP / M and DOS consisting of drivers and other software designed to manage peripheral devices, such as monitors, disk drives, and printers. BIT: short for "binary digit". The smallest unit of information that can be stored computer. Bit can be either value 1 or 0. Eight bits equal one byte.

BUG: programming error that can cause a program or system to function incorrectly or crash (not used). 

BUNDLE: sales practices and the application of computers together in a promotional effort.

BUS: line is used for distribute data on a computer. The bus is a set of electrical or electronic connection between the microprocessor and other hardware, such as disk drives, logic boards, etc..

BYTE: the size of computer memory or disk capacity. One byte with eight bits and can store one ASCII character, which can include numbers, letters, or punctuation.

CD-ROM: Compact Disk read-only memory. Optical storage systems that can record the information permanently on a Compact Disk (very similar to the disks used for music), and then publish it on the computer screen.

CGA: Color Graphics Adapter.Standard color screen which IBM introduced in 1981. CGA circuit board allows the monitor to display the four-color 320 X 200 pixels. In 1984, EGA (standard higher resolution) replaces the CGA standard.

CHIP: the unofficial name for the integrated circuit.Example: view the microprocessor.

COBOL: Common Business-Oriented Language. High-level programming language designed for business applications. COBOL is the language most widely used to program applications for mainframes since the 1960s.

CP / M: Control Program / ​​Microcomputer. One of the first microcomputer operating system.

DISK: also called a diskette; magnetic storage media is the most commonly used for microcomputers. "Floppy Disk" to a diameter of 5 or 3. Program applications are packaged and sold on disks, and users store data on floppy disks.

DISK DRIVE: A tool for call information from or recording information to disk. The computer can have one or more disk drives. Disk drives can also be installed as a peripheral device.

DOS: Disk Operating-System. The name that is usually used to refer to the MS-DOS (Microsoft products) or PC-DOS (IBM's adaptation of the MS-DOS).

DOS operating system became the most widely used for IBM-compatible computers. EGA: Enchanced Graphics Adapter. Standard view higher resolution than CGA.

EGA resolution is 640 X 350 in 16 colors. In 1987, replaced by a standard VGA EGA.

FORTRAN: Formula Translation. Programming language developed in 1956 by John Backus at IBM, is mainly used to deal with scientific and mathematical formulas.

Graphical User Interface (GUI): The method for displaying text and graphics on a computer screen through the image and the image formed by a pattern of dots.

HARD DISK: magnetic storage media made ​​of iron. Hard disk offers storage capacity lebi information than the floppy disk and can be directly installed on the computer.

HIGH-LEVEL LANGUAGE: programming languages ​​- such as BASIC, FORTRAN, COBOL, Pascal, etc.. - That allow programmers to write instructions with sentences similar to the English language daily to control the computer.

Kilobyte (K): unit of computer memory size.A K equal to 1024 (210) bytes.


LOW-LEVEL LANGUAGE: programming languages, such as assembly language, which is one more step away from the machine instructions that can be understood microprocessor. The language is very different from English daily and requires technical knowledge of high level hardware.

MCA: Micro Channel Architecture.Multitasking 32-bit bus introduced by IBM in 1987 PS/2-nya computer. This bus does not support the expansion card is made ​​for PCs before. Megabyte (MB): unit of measure of computer memory. One megabyte equal to 1,024 kilobytes.

MICROPROSSESOR: Central Prossesing Unit (CPU) on a micro computer. The microprocessor is the integrated circuit or chip in the computer's main circuit board. The microprocessor uses to regulate the electrical conduction of computer work.

MODEM: a device for delivering data from one computer to another computer via a telecommunications line.

Multitasking: the operating system is the method used to carry out some operations in bersamaaan. With a multitasking system, the user can print a document, working on a worksheet, and receiving data from a modem at the same time.

OPERATING SYSTEM: a program that became the basis for the functioning of a computer. The operating system determines how to handle the data when it is inserted into or retrieved from memory and set all the basic functions of computers.

PASCAL: high-level programming language developed by Nicklas Wirth. Pascal is widely used for teaching computer science.

PIXEL: short for picture element, each point that forms an image on a video screen.

RAM: Random-Access Memory.

RAM usually refers to computer memory that stores information temporarily.

ROM: Read-Only Memory. The information is permanently recorded and can be read by a computer but can not be changed by the user.

VGA: Video Graphics Array. Color graphic standard introduced by IBM with the PS / 2 those in WINDOW: on the Macintosh or Microsoft Windows computers, for example, is a rectangular area on a computer screen that displays a document or application being berjalan.window also can display the contents of a floppy disk or hard drive. Users can open or close the window, resize, and move it to another spot on the screen in question.Users can open several windows at once and the window-window may overlap, depending on the system. Window concept was originally developed at Xerox and the first commercial use on Macintosh computers.

WINDOWING ENVIRONMENT: software that allows multiple programs or DOS on IBM PC compatibles, for example, opened and run simultaneously on a separate window.

All About Hardisk

1. How a Hard Drive
Hard Drive: a storage device (storage) that record data quickly into magnetic pulses on a platter / disk rotating metal. When a CPU is the brains of a PC, then the hard drive serves as the heart, pumping the data vital to the entire system. As a component that drives the virtual computer, hard drive is also a mystery. Most people can not see the inside of a hard drive, blocked by the aluminum cover, though perhaps people are very familiar with the files and programs are stored, copied, moved, and deleted from the hard drive. · Hard drive into a long-term storage media on PC You. · The storage capacity on a new type of hard drive to increase each year (the current largest is 80GB), but the physical size of the drive remains relatively unchanged. · The faster a drive spins, the faster you access and transfer data. · With the increasing number of large-capacity hard drives on the market, the cost for a drive (usually measured as the number of dollars per megabyte) getting down. Hard drive provides data storage in which all modern computers need it. A hard drive stores information by placing a magnetic field through the surface of a disk coated magnetic material moving around. The main principle of a hard drive - the use of magnetism to store information - extremely miri to that used on a tape recorder or video. A hard drive for storing digital data mangetik point on the surface of a disk. A bit (composed as a bit of your data) suggests a value of 0 when the disk is magnetized in one direction, and the value 1 if the opposite direction. Each individual in a hard disk drive called a platter (plate / metal disk). A large-capacity hard drives usually contain some 3.5-inch diameter platter and use both sides as a storage medium. Drive letter itself has a motor that rotates at a speed of 4500 to 15,000 rotations per minute. Hard drive recorder uses a device called the "head" to write and read data from any surface of the platter. Drive to position a head, bergantun an arm that can move with microscopic distances above the surface of the platter on each side. So for the hard drive platter that has a five head will have ten pieces that rely on ten motor arm. Other elements in the head reads the data recorded by sensing the magnetic field at any specified bit as it passes through the magnetic element is read. drives record data on a concentric circles called "tracks", and divide each track into segments known as "sector". You can imagine that the track can be interpreted as a bookshelf where each segment is defined as the books in it. When the operating system needs a file located on a particular track and sector, then it sends the request to the hard drive to get data on that particular address.

2.How Hard Drive Works
When an operating system sends data to the hard drive for recording, The drive to process the data using a complex mathematical formula that adds an extra bit in the data. Bit it did not take place: In the future, when the data is retrieved, the extra bits that allow the drive to detect and correct errors caused by random variation of the magnetic field inside the driver. Then, the drive head to move through the appropriate track from the platter . Time to move the head is called the "seek time". While at the track is right, wait until the drive platter spins up to the desired sector is under the head. The amount of time is called "drive latency". The shorter the time `seek` and `` latency, the faster the drive the job done. As electronic components drive determines that a head is above the appropriate sector to write data, the drive sends electrical pulses to the head. Pulse generates a magnetic field that changes the magnetic surface on the platter. Variation that is now representing a recorded data. Reading the data requires some process of recording.Drive to position the reader over the head of the appropriate track, and then wait for the right sector to rotate on it. When certain magnetic spectrum that represent your data in the appropriate sector and track just above the head reader, electronic components drive detect small changes in magnetic field and convert it to bits. When the drive is seleai check on the bit error and correct it if necessary, it then sends that data to the operating system.

3.Interface? What is?
Interface hard drives are simply the hardware that manages the exchange of data between your computer and your hard drive. You usually deal with one type of interface on the PC in circulation: Advanced Technology Attachment, also known as ATA interface (or IDE, integrated device electronics). Hard drives that use this interface usually come with a variety of flavors, such as Ultra ATA, Ultra DMA or EIDE, depending on the vendor you visit. The second most popular interfaces are SCSI (small component system interface), which is widely used on the server and the drive for an older Apple Macintosh computers. the first ATA interface supports a maximum transfer rate of 8.3 MB per second. ATA-2 increases the maximum throughput to 16.6 MB per second. Although not yet a formal standard, Ultra DMA and Ultra DMA-33-66 was generally accepted by the industry the hard drive to interface with maximum transfer speed, respectively, 33MB per second and 66MB per second. Seagate recently announced it has begun shipping the Barracuda ATA III drives with Ultra ATA-100 interface is the main target to replace the SCSI interfaces on the server RAID (redundant array of independent disks).

4.Hard Drive Offers 
Encouraging Use of the IBM PC-XT type of early comes with a hard drive first mass-produced: a drive with a capacity of 5.25-inch diameter platter 10MB - the * wow * is very large at that time. Twenty years later, the latest hard drive with 3.5-inch diameter platter can store up to 70GB of data. Drive 2.5 inch smaller on the notebook can hold up to 25GB of data. And a diameter of 1 inch Microdrive is designed for digital cameras, players, and handheld computers that can accommodate up to 1GB of data. Along with the transition size reduction drive and a larger capacity has lowered the cost per megabyte of storage dramatically, so that any large-capacity drives can be had by ordinary computer users. You can buy a hard drive designed specifically for three distinct uses: desktop PC, the computer notebooks, and servers. Attributes which distinguish them not at capacity - although more nicer - but on other factors that determine the performance: the speed of the motor drive, on-board memory, the drive interface, and power consumption.

5.Drive Special Duties 
Specific To become the most important price on the consumer desktop market. A computer system that is built from the ground may include a high-speed 5400-rpm drive with IDE interface, the curve represents the sweet spot of price-versus-performance (price-performance), a price below U.S. $ 300 for a decent amount of storage space a lot. High-performance workstations is usually accompanied by 7200-rpm drive, and in the next year 10,000-rpm speeds are common. In the notebook computer market, the most important thing is power conservation. Drive slow spinning hard drives reduce power consumption of laptop batteries. Storage resources on a notebook drive away than to drive up to the desktop, due to its small size platternya. In the server market, most important goal is performance. On a commercial server that handles the online sales, for example, the drive must be able to handle many requests for data in different sectors as quickly as possible.Here, you'll see a lot more drive with SCSI interface (which is in the set-up in a line of RAID) rotates at a speed 10,000-rpm, and the drive speed of up to 15 000-rpm rotary has started to reveal itself. Drive has several drawbacks, such as the heat generated higher and more noisy than usual drive.

6.Harga Always Rain
In the last three years, hard drive prices have plummeted while capacity is increasing.Vendors have warned that they eliminate the unnecessary costs of the drive with the integration of electronic components, reducing component count and increase reliability.With 150 million drive that will be marketed this year and the estimated 200 million more in the next two years, the market is already very large this seems to be growing. System desktop worth less than U.S. $ 1000 typically offer drive 8GB or larger, which is the value of The minimum you should get on most systems. For middle-class desktop with a price range of around U.S. $ 1500, a 40GB hard drive capacity is more frequently encountered.But one vendor estimates, in the next five years, the proportion of the price allocated to the computer hard drive will increase slightly. Costs for other components will drop the cost for hard drive maintained constant. It's not a bad news: As capacity increases, cost per megabytenya tends to decrease. When you are satisfied with your current desktop systems, but only wanted to increase the storage capacity of your disk, just add a new hard drive.Unless you buy a drive for a big server who sat in the office, drive popular now able to provide satisfactory performance (with the rotary speed of 5400 up to 7200-rpm) and of sufficient capacity (20GB-40GB) for the money you spend. As of this writing, the online computer store you can find the hard drive from Maxtor Diamondmax 30GB at prices below U.S. $ 200. While the money of U.S. $ 260 you can get a Maxtor drive with a capacity of 40GB. IBM sells the drive capacity of 75GB, which is intended for enterprise servers with prices ranging from U.S. $ 500. When you buy a new drive, you can see that the vendors and shops usually sell out "maximum transfer rate" or "burst speed" of their drive. The value does not mean anything, they just describe the specifications of the drive interface. Usually these values ​​are used as marketing propaganda; in general, your drive will not reach the level of maximum speed.

7.Masa Home Hard Drive
Based on the commercial development of the head giant magnetoresistive (GMR), which gives strength to the current large-capacity drive, drive capacity doubled two every 18 months. In the next five years, GMR technology will be able to double the capacity of hard drives every 12 months. Furthermore, the vendor must find a way to fight the laws of physics and learn how to create a more seamless platter and a smaller head. One of the biggest challenges will be concerned at this point called super-paramagnetic limit, where the bit size of the drive will be very small so that the thermodynamic fluctuations can cause data loss. And a storage company is currently engaged to seek new kind of storage. Even so, according to one hard drive vendor, the future of this industry is very bright - especially for its customers.

Sources: http://www.infokomputer.com

All About Computer Viruses

1. Method Works Computer Virus
A computer virus: A computer code which is able to "reproduce itself" that put part or all of the code in the file or application, and result in your computer do things that do not want.computer viruses is a common disease in the world modern technology. They can spread rapidly through the open computer networks like the Internet, and resulted in losses to billions of dollars in no time. Five years ago, the opportunity for a virus contracted during the period of 12 months is about 1 in 1000; now the comparison is increased dramatically to about 1 in 10. Vital statistics of the virus: · Viruses get into your system via e-mail, downloads, infected floppy disk, or (sometimes) by hacking. · From the definition, a virus must be able to "own culture" (aka make a clone or a copy of itself) to be spread. · Currently there are thousands of viruses, but few have been found "in the wild" (roaming, undetected, in the network) because most of the known viruses of laboratory born, which is a variant of the virus "wild" that is widely available in the world. · Consequences virus can range from annoying to extremely destructive, but even the simplest virus has a tendency to ruin because of a bug in their computer code (as virus programmer is careless or do have malicious intent). · antivirus software on the market today can detect almost all types of viruses exist, but should be updated regularly to maintain effectiveness. A virus is simply a computer program. As with other computer programs, in which there are instructions that can tell the computer to perform specific tasks. But in contrast to the application program, a computer virus is usually ordered you to do things that you really do not want, and can usually spread itself to existing files on your computer - and sometimes to other people's computers. When you lucky, a virus is at best only cause the computer to perform bizarre actions, such as causing your computer speakers sound "blip-blip-blip" at random. The most feared is a vicious virus that can cause all data on your hard drive is lost (by ordering the computer to format a hard drive), even a virus that can damage your computer hardware, such as the CIH virus that destroys your computer's motherboard BIOS.

2.How My Computer to Virus Affected?
Your computer can become infected with the virus when you copy a file that terinfeks into the computer, then activate the code of his body when an infected file is executed or opened. Maybe you do not feel menyalinkan infected file into your computer: Hey, the virus does not matter if they stick to the e-mail attachment, when you're downloading a file, or through a floppy disk that is often borrowed, lent. And now, with the increase in Internet users, the trend of the spread of the virus is through e-mail attachment. When you open an infected file or application, malicious code copies itself to a file on your system, then wait to send it - whatever the programmer designed it to be done on other people's computers. By simply removing the infected e-mail after you open the file attachment was not going to help, because the virus has already penetrated into your computer system before. A virus writer can set the time of virus attack, then and there, at a specific time or date, or when a particular command is executed, for example, when you order to save or close a file. Example: Michelangelo virus is programmed to release the code perusaknya every 6 March each year - which is the anniversary date of the General

3.type virus
 Nowadays many kinds of variations of the virus in circulation, most of which can be grouped into six general categories, each of which slightly different kind of how it works: · boot-sector viruses: replacing or inserting itself into the boot sector - an area on your hard drive (or any other disk) to be accessed when the computer is first turned on. This type of virus can hinder your computer to boot from the hard disk. · Virus file: infects applications. This virus to spread itself to execute the application and documents associated with it when the infected file is opened or executed. · Macro Virus: is written using a simplified macro programming language, and Microsoft Office applications, like Word and Excel, and is currently estimated 75 percent of this strain has spread across the world. A document infected with a macro virus generally modifies the existing command and widely used (like the "Save") to trigger its payload upon execution of that command. · Multipartite Virus: infects both files and boot sector - under the guise of a criminal ganda that can infect your system before it was captured by continuous antivirus scanner. · Polymorphic Virus: changes code whenever it passes on a different machine; theoretically this type of virus is more difficult to be detected by the antivirus scanner, but in reality this type of virus is not well written, so it's easy to know his whereabouts. · Stealth Virus: hides its presence by making an infected file not appear infected, but usually stand up to antivirus software.

4.All Evil Code (Malicious Code)
Virus is not one of perception wrong in the computer is bad electronic code, such as worms and Trojan horse applications is a type of virus. They are not viruses. Worms, Trojan horses and viruses in a large category of so-called analysts as a "malicious code". A worm will replicate itself and go into network connections to infect any machine on the network and then replicate itself again, taking up space and slow down hard disk computers and networks work. Even so, the worm does not modify or delete other files. A Trojan horse does not replicate itself, but he is in the form of a malicious program disguised as another format such as a screen saver or image files.When executed on your machine, a Trojan horse will take the information from your system - such as user names and passwords - or could allow a malicious hacker to take over your computer remotely (from a distance).

5.Software Antivirus Emergency Call Answering
The virus experts have indexed about 40,000 kinds of virus and its variants over the years, although only 200 species are currently active in the wilds of the computer. While most viruses are just annoying more and spend our time, of a kind very merusaklah very harmful to health [computer and your pocket]. Computer viruses have been around since 1960, since the beginning of the computer era, although the range in 1980 until they were mostly just specimens in the computer lab, created by researchers and released in a controlled environment to evaluate their effects. When the virus was first discovered on the surface in the 1980s, they spread very slowly, and move through "a network of smugglers": through floppy disks that are sold and shared between computers. But with the Internet and e-mail access to the accelerated spread of the virus. Two years ago, starting with the emergence of LoveLetter Melissa virus, the virus spread through e-mail continues to increase so that the ratio of ordinary computer users face virus was getting bigger. E-mail virus now occupy the top spot in which he accounted for 81 percent of the causes of a computer infected with viruses and can spread into the system in minutes.
6.Berlatih Computer Safely
best way to protect yourself [er, computer] you from the virus is if You have a connection to the Internet, do not open e-mail attachments from strangers, and avoid downloading from unknown sources. Resist the urge to double-click on the contents of your mailbox. And when you get a file attachment and you do not ask, ask the sender about the contents of attachments and how to use it before it opened. For security reasons, you need to install antivirus scanning software that is reliable and always download updates regularly. Major antivirus software vendors, like Symantec, Network Associates, Computer Associates, and Kaspersky Lab, provides a regular update service (as a record of Computer Associates InoculateIT antivirus software which is free). Some vendors also offer regular update services through their company Web site. Update on a regular basis is very important. The researchers from the Computer Economics estimates that 30 percent of small businesses are particularly vulnerable to the dangers of viruses and it is because they do not update their antivirus software regularly or they are not properly menginstalasikannya.

7.How Work Antivirus Software
 Antivirus software scans the contents of computer hard disk in two ways . If there are known viruses (ie viruses known to exist and antidotes have been found) then the software will look for the signature (sign) virus - is a unique string of bytes that identifies the virus virus program is like a fingerprint - and will throw from your system. Most scanning software does not just look for the early type virus, but also can search for variants of the virus, because the code of the virus signature is usually similar. In the case of a new virus that has not found its antidote, antivirus software will run a program that will search heuristic virus-like activity on your system. If the program is not right to see any symptoms, it will quarantine the troubled program and will display a warning message to you about what will be done by the program (eg change your Windows registry). If you feel that the program and software is a virus, you can send files that have been quarantined at antivirus software vendor to be analyzed, to determine the signature, name it and put it in the catalog, and send her an antidote. Virus is a virus that is now known. If the virus does not appear again - this often happens because the virus is not well written for the spread - the vendor would categorize it as a dormant virus (virus sleep). But most viruses spread like an earthquake: The spread initially always accompanied by subsequent events. Variant virus (virus tracing the spread of the virus that emerged after the first) will increase the number of virus types that exist. An example is when the Melissa virus LoveLetter appeared in the United States, its variants - VeryFunnyJoke - straight up in a few moments, followed by more than 30 other species two months later. And not all variants derived from the mysterious author of the program. Some companies have been infected by a variant of the virus is spread by the employees themselves are full of curiosity to the virus which they are received, creating variants, and releasing it in their company's computer system - sometimes inadvertently, sometimes it wants to do it.

Source:http: / / www.infokomputer.com

Creating Image Auto Signature in Gmail

A picture is worth a thousand words have value. Maybe you want to have an image or logo that will appear at the bottom of every email you send. Now a free email like Gmail you can do it.

By having a picture or logo, or it could be a picture of your signature is its own uniqueness of the email you send. How you're interested in him?. This article will provide instructions or steps of manufacture.


Steps:
1. Upload a picture / logo you to a site
to add a picture or a logo, you should save an image file or a logo on a particular site. Freeonline sites really offer a lot of image storage, such as picasa.com . But first have to download first and then upload your image. Can also sites.google.com

2. Log into your account the next Gmail your
account Log into Gmail you. If you do not have an account with Gmail , sign up for one in Gmail . com
3. Choose "Mail Settings"
In the upper right corner of your Gmail page, you will find a gear icon, click it. Choose "Mail Settings" from thedrop-down.

4. Then drops down into subheadings Signature
After clicking on the Mail Settings, the page will open. Scroll down to the middle of the page until you get the option "Signature".

5. Click on the icon "insert image"
Click the "Insert Image" icon on the toolbar above the text box.


6. Copy and paste the URL of any image
or URL Enter the web address of the image you want to use there. If your picture is correct, you will see in the preview image.


7. Click save changes
Now, click on save changes. You've added a photo to your signature works!
To try please select write (e-mail) to be sent, well then it will automatically be filled with signature images as examples of pictures that I entered.


Hopefully this article on your computer Create a Signature Image Automatically in Gmail can be beneficial.

Thursday, 29 March 2012

The problem that often occurs on the computer

Your PC will not act at all? Hard drive not detected, the optical drive is slow, which is not optimal monitor looks, or the router hangs too often? Do not panic, find the solution here! Occasionally this can happen. PC suddenly acting up, and can not be resolved easily. While you've been reading various troubleshooting guide in the manual are available. And it can also occur in Anda.Tidak looked at the situation and conditions, a system can be acting up. It could be right after you do the update driver. Or after the addition of enhancements to your system. Or occur suddenly, without warning or notice sebelumnya.Dan review will discuss the things mentioned above. Have no need to panic anxiety and deal with it. Sit quietly, and just follow the discussion this time. Hopefully one of them is the answer to the problem you face with your favorite PC. New, Not Mean Bug-Free is not always the latest technology to provide the best for users. Even the few times we have witnessed, a product that carries the latest technology, the initial batch also be accompanied by a fairly dizzying perbagai problem. For example, a motherboard with the latest chipset. Here are some cases that is often felt by the members of the Media PC lab.Needed to be some small-scale research, to be able to run a series of tests to perfect. Starting from the occasional search for BIOS updates, driver updates, or just manually updating of the product concerned. Another example is to test the video card. With the sharpening of competition ATI Radeon and nVidia, makes a variety of products with the latest chipset, kept coming to our lab. Which ultimately requires a software patch testing solutions. To be able to run it. Then, what happens in the real world? In the daily use of your PC Opening Step As in chess, the first step will be decisive. So also in solving problems that occur with your PC. In this subbahasan, will contain about the most important step in trying to resolve problems with your PC. The important thing is to try to find out, what's causing your PC acting up. The last change what happens on your PC? It is very important to know for sure. Remember, this will greatly facilitate the settlement to be done. Adjusted to the possibility of problems occurring. From here, makes it possible to narrow down the possible problems that occur with your PC. 1. PC Not Reacting, When Power Button Pressed. Problem: You press the power button to turn on your PC, but PC does not show signs of life. What happened? Solution: If this happens on your PC, there are several possibilities that must be examined one by one gradually.

Step 1: Check all the electrical grid, from the AC outlet to the PSU (power supply unit) PC. Is it installed perfectly. Starting from the PSU to make sure the switch in the ON position, or should you use a UPS (uniterruptable power supply) and / or stabilizer AVR (automated voltage regulator). Make sure all the ON position and in a state to function properly. Step 2: If it is not the cause, then the next possibility of new on your PC. Make sure all cables (especially power cables) and the component is installed properly. The trick with mebuka casing, then squeeze the components of existing cables and connectors. Sometimes this is because the connector is not connected properly. Note also ATX 12V, which can be found on most motherboards these past four years. Motherboard will not act, no portion of this connector. Step 3: It would be quite troublesome. Make a check of device one by one. The definition is a CPU and motherboard.Make sure both are still functioning properly. Because let's say if the CPU is damaged, the system will not turn at all. Likewise, if the motherboard is damaged. Especially for the affairs of its power supply (MOSFET, power lines on the PCB and so on). It will also cause the PC will not react at all.

 2. Fan, Hard Drive A rotation, but the Dark Fixed Monitor Screen. Problem: PC react.There was the sound of fan rotation, and other signs of life from the hard drive, optical drive and others. However, the monitor remains dark. Solution: Fiuhh ... at least it was slightly better than the problem number 1. For this problem, you should rely on marks given by the BIOS POST.Make sure the speaker casing is installed properly, so you can hear the POST beep a certain combination is available on most motherboards. Or on some new motherboards, integrated buzzer is also available on the motherboard. Even easier if the motherboard with BIOS POST code display in the form of two seven segment LED, which will display the code hexagesimal. Had you not know the meaning of the code (either sound or light) or even lose the manual, once again no need to panic. You can try opening the site Bios Central (http://www.bioscentral.com).Disk Keep a variety of documents, favorite songs in MP3 format, 3D games installations (up to units of gigabytes in size), some even collect DivX video download format , or master the transfer of digital video camcorders. It is not strange if the hard drive with full speed. Adding a hard drive too, was not free from some of the problems that might arise.

3. System Not Recognize New Hard Drive.
Problem: new hard drive installed, it is not detected either in Windows or the BIOS though.
Solution: The point is to install and configure the hard drive correctly. Harddrive not include a hard component in the installation process. However, there are several steps that must certainly have been done, when installing the hard drive.

Step 1: Make sure the hard drive is getting power supply from the PSU. Trivial mistakes like this could happen. Given the location of hard drive is usually on the front casing. Sometimes you connect the power branch of the fan, who did not get the power supply from the PSU. This could also be due to lack of power connector from the PSU.
Step 2: Make sure that the master and slave hard drive exactly as desired. Or if you want to use cable select on the configuration, make sure to use the configuration on the second hard drive, old and new. 
Step 3: If you want to use cable select configuration, consider the installation of the IDE cable on the hard drive. Some of the new cable, has given a special mark, to help determine which connectors will be regarded as a master, and connectors which will be considered as a slave. If not available, the easiest way is by following the basic rules. Tip of the connector is located is designated as master. While the connector in the center, will be treated as a slave. 
Step 4: If it all has not been able to resolve the problem, then an alternative answer to the BIOS settings. On the main options Integrated Peripheral, usually there is a choice for the IDE controller. Here also there is the option for setting the SATA hard drive controller. Had you experienced similar problems, when trying to add a new air-interface hard drive SATA. Especially for SATA hard drive and Windows, do not forget to install the driver that is usually supplied by motherboard manufacturers. Or update, depending on the motherboard chipset it uses.

4. Harddisk detected, but can not be operated.
problems: BIOS detects the presence of the hard drive. But not so with Windows and even DOS.
Solution: This is not a big problem. All you need do is create a partition, and then format the new hard drive. Due to the new hard drive is not formatted in a file system that can be recognized by Windows or DOS. There are several possibilities to do with the new hard drive. Possibility 1: If you want to install the new hard drive with Windows 9x operating system, it requires some basic knowledge about the FDISK command. For this one, we strongly recommend to use this command you are accompanied by someone with experience. Possible 2: If you want to install the Windows 2000/XP or some of the latest Linux distributions today, you no longer have to bother dealing with the command FDISK. They provide the option during the installation process.Just follow the steps and options are given. At least it's easier than using the FDISK command for most people. Possible 3: If the new hard drive will be used as an additional hard drive for data storage, it will be easier. For example you are using Windows XP operating system. By using a user who has administrator rights you can do the following. Simply go to Disk Management. One of them by right clicking on My Computer, choose Manage. Notice the left column. Later in the Storage, select Disk Management. From here you can view and manage your new hard drive more easily. Note: Be careful when using the facilities available on Disk Management. Do not let one choose the hard drive. Because data on the hard disk or partition may be lost. Similarly, when using FDISK or a similar function available in the operating system installation process. 5.Installing a New Hard Drive Extra Large. Problem: Hard Drive 200 GB not detected either in the BIOS, let alone Windows. In fact, step on the tip to 03 and 04 have been executed all. Solution: Along with time and technological advances that exist, then a large disk mass product is available in the market. With a relatively affordable price. The core problem is the use of the method of LBA (Logical Block Addressing) is used. The problem for the above, usually caused by hard disk larger than 137 GB, using 48-bit LBA method. To that end, the first thing to do is to ascertain whether the BIOS is used, it supports 48 bit LBA. For example here is to use 48-bit LBA Test Program for the Intel Application Accelerator (http://support.intel.com/support/chipsets/iaa/sb/CS-009302.htm). Simply by running a simple application 48lbachk.exe on the system. If you find that BIOS is not supported, it is necessary to update the BIOS. Note the readme are available on the BIOS update. Make sure the update that will be used, it can resolve compatibility issues 48-bit LBA hard drive. Drive Optical Devices this one may have long relied on business storage. These may be some problems that may occur.

6. Burner No Software Works on New Optical Drive.
Problem: Suppose you had to say goodbye to the old CDRW drive. And replace it with a new burner drive. But you just realize, that mainstay Nero burner software, can not be used with the new drive. Why is that?
Solution: At the beginning of the heyday of the CD-RW drive, most of the sales package comes with the burner software. However, now many outstanding optical drive that is not accompanied with the burner software.
Please note, OEM licenses are granted for package sales. And devoted to the bundled product.And Nero have protection, so it can only be used specifically for the drive. To continue to use it to drive a new burner, the most minimal cost is to upgrade. TODD ​​Nero 6 Reloaded Upgrade Serial Number (www.nero.com, for U.S. $ 39.99). This is cheaper than the full version. 

7. Write speed is not fast as Promised. Problem: specification does not promise 100% correspond to reality. But if it takes a write up to two times or more the time appointed, there must be something wrong. What causes it? Solution: This may not be so much felt, even to CD-RW drive is the fastest though. However, if it is switched to the DVD burner drive, the difference will be felt. It could take more than an hour to complete writing data on DVD media with a capacity of 4.7 GB.All you need is confirmed, either hard disk or optical drive is used, has worked in Ultra DMA mode (Direct Memory Access). How to check, on Windows XP with respect to the Device Manager. Open the IDE controller on the tree. And look at the Advanced Settings tab. Note on the Current Transfer Mode. Check on each IDE controller in which the hard drive and optical drive installed. VGA and Display Both are designed to pamper the eyes of its users. With VGA, more powerful, you'll get a better frame rate. Whereas with a better display, you'll get a resolution and refresh rate that is not tiring the eyes. However, that does not mean they are free from problems. 

8. Video Card driver is not installed with Perfect. Problem: It seems the driver installation process is running perfectly. But after a system restart, there is a warning error box: "cli.exe Application Error. The application failed to initialize properly (0xc0000135). Click OK to terminate the application. "What causes it and how do I fix this? Solution: Some of the users video card with ATI Radeon VPU chipset never felt it. Especially if you never update the drivers and supporting applications using the ATI Catalyst. For information, ATI Catalyst that are specific to this Windows operating system, built using Microsoft. NET Framework SDK. Operating systems need to be added by installing the Microsoft. NET Framework. Which is now available for version 1.1. It will be useful in case you would also install applications created by using Microsoft. NET Framework SDK. To solve all the problems, which led to the emergence of a similar pop up window. 

9. Avoiding Error Message When Installing Update Driver VGA. Problem: How should an update VGA driver. Because in some cases, there is often an error message appears. Solution: While no specific instructions are included on the installer file update VGA driver, which suggested to uninstall the old drivers that were previously installed. However, you should do the clean operating system from the old driver who ever lived. Before installing the latest update is desired. For VGA users with ATI Radeon chipset, you can easily uninstall the old drivers, along with some supporting applications. Because ATI has also included ATI CATALYST Uninstaller, which is automatically included when ATI CATALYST driver installation process. For others, it needs its own tricks. Quite a number of alternatives to clean the old drivers. You can use Driver Cleaner, which is now available Driver Cleaner 3.3, Professional Edition or its variants (www.drivercleaner.net).

10. Improve the appearance of the Monitor.
Problem: You have to choose the best monitor. Say a TFT-LCD Monitor, or "just" a leading brand of CRT monitors, which are often won hardware reviews. However, the resulting display is not satisfactory. What to do?
Solution: As great as any device whatever, will not be optimal without the optimal configuration.So also for the monitor.
Most LCD monitors have a special button AUTO (or similar), for automatic configuration. In accordance with the data communicated between the monitor with a video card with DDC. But it is sometimes not perfect. Most of the moire interference is still felt. You can use the Monitor Test, and try to moire interference is minimal. For CRT monitors, mostly at the level of contrast and brightness problems. Contrast will adjust the monitor power light. But if too much will tire the eyes. Brightness will lighten. However, if too high, it will lose the black level. And in some cases will also interfere with the display monitor focus.
Networking
does offer DSL Internet connection speed is fairly satisfactory. Package offering price range, can be tailored to the needs. However, any problem can not be separated from it. And it's not an easy thing to make an Internet connection is free of problems. 

11. Hang the router, and should be restarted. issues: first, when installing the router, this never happened. But lately, it's often the router hangs and needs to be restarted to get Internet connection on a PC connected to the router. Solution: Even with the best configuration, the router can still have a hang. Usually this is due to too many connection requests at the same time. And so far, the only solution is to restart the router (turn it off and then turn it back).

Step 1: If your router manufacturer has provided a firmware update, you can try to update the firmware to fix the routing process and prevent a crash on the router. 
Step 2: You can take precautions. This sort of thing can also be caused by viruses, spyware is also an attack PCs.Run antivirus and antispyware that has been updated, to check on each PC. 
Step 3: Consider the applications installed on each PC client router. Especially some of the applications file sharing Peer to Peer (P2P). Such applications can also cause this. If not configured properly, P2P software can simply open Sharring his permission, so that if the request will automatically be a burden too much work your router. 12. Connection with Wi-Fi Sometimes Disconnected.Problem: network connection using Wi-Fi, occasionally interrupted suddenly. For no apparent reason. This occasionally happens in Centrino notebooks are already equipped with Wi-Fi connection. Solution: Usually this is because the power saving mode. Centrino notebooks by default this function is enabled with the intent to save battery consumption. The easiest way is to use the Intel PROSet application (if available). Or through properties in WI-Fi ethernet device, the Network Connections. Then select Configure. On Adcanced tab, there is a setting to optimize power consumption. Ad Hoc Transmit Power, influence the range. Meanwhile, Power Management, will adjust to the condition of the battery, and notebook idle time. And will automatically lower the power consumption of the battery. This, which is likely to cause Wi-Fi connection is disconnected. So there are two alternatives that can be done. 
Option 1: Setting the maximum position for both of these functions. Especially if you're not worried about the remaining battery capacity. Because the available shortcut keys to instantly turn off the Wi-Fi in most Centrino notebooks.
Option 2: Adjust the style of your notebook usage. Learn the use of the notebook idle time. And tried in accordance with the habits of everyday use. Surely you do not want your Wi-Fi connection suddenly disconnected because idle time of 5 minutes has elapsed. And you just leave your notebook, to simply using the toilet or make a cup of hot coffee. - B. Setyo Ryanto

Wednesday, 28 March 2012

Commands In HTML

TEKS

Berikut ini adalah perintah-perintah HTML untuk penanganan TEKS.

<H1> Sampai <H6>

fungsi : untuk membuat (memilih) ukuran teks.

Sintak : <H1> </H1>

Contoh

<HTML>
<HEAD><TITLE>Contoh Heading</TITLE></HEAD>
<BODY>
<H1> Teks dengan Heading 1</H1>
<H2> Teks dengan Heading 2</H2>
<H3> Teks dengan Heading 3</H3>
<H4> Teks dengan Heading 4</H4>
<H5> Teks dengan Heading 5</H5>
<H6> Teks dengan Heading 6</H6>
</BODY>
</HTML>

<HR>

Perintah ini digunakan untuk membuat garis horizontal penuh layar

Sintaks : <HR>

Contoh :

<HTML>
<HEAD><TITLE> </TITLE></HEAD>
<BODY>

<HR> Kalimat ini diapit oleh 2 buah garis<HR>

</BODY>
</HTML>

<I>

Perintah ini digunakan untuk membuat teks miring.

Sintaks : <I> </I>

Contoh

<HTML>

<HEAD><TITLE> </TITLE></HEAD>

<BODY>

<I> Selamat Datang Ke Websiteku</I>

</BODY>

</HTML>

<B>

Perintah ini digunakan untuk membuat teks tebal.

Sintaks : <B> </B>

Contoh

<HTML>
<HEAD><TITLE> </TITLE></HEAD>
<BODY>

<B> Selamat Datang Ke Websiteku</B>

</BODY>

</HTML>

<U>

Perintah ini digunakan untuk membuat teks bergaris bawah.

Sintaks : <U> </U>

<HTML>

<HEAD><TITLE> </TITLE></HEAD>

<BODY>

<U> Selamat Datang Ke Websiteku</U>

<U><B> Selamat Datang Ke Websiteku</U></B>

</BODY>

</HTML>

<CENTER>

Perintah ini untuk membuat teks ke tengah layar.

Sintaks : <CENTER> </CENTER>

Contoh :

<HTML>
<HEAD><TITLE> </TITLE></HEAD>
<BODY>
<H1><CENTER> Selamat Datang Ke Websiteku</CENTER></H1>
</BODY>
</HTML>

ALIGN

Digunakan untuk membuat teks rata kiri, tengah, kanan atau rata kanan dan kiri.

Sintaks :

<P ALIGN=right> → Rata Kanan
<P ALIGN=left> → Rata Kiri
<P ALIGN=center> → Rata Tengah
<P ALIGN=justify> → Rata Kanan dan Kiri

atau

<H ALIGN=right>
<H ALIGN=left>
<H ALIGN=center>
<H ALIGN=justify>

Contoh pemakaian :

<H2 ALIGN=center>SELAMAT DATANG </H2>

<BR> (Line Break)

Perintah ini digunakan untuk memasukan fungsi Enter. Sebagai contoh, jika perintah <BR> diberikan di akhir baris, maka kalimat berikutnya akan dicetak pada baris berikutnya.

<!–

Perintah untuk membuat KOMENTAR. Semua teks atau perintah yang diapit perintah ini tidak akan dijalankan. Ini hanya komentar untuk program.

Sintaks : <!– –>

Contoh : <!—Ini adalah contoh komentar –>

<SMALL>

Perintah untuk membuat teks berukuran kecil.

<BIG>

Perintah untuk membuat teks berukuran besar

<P> (Paragraph)

Perintah ini digunakan untuk memisahkan paragraph yang satu dengan paragraph yang lain.

Sintaks : <P> </P>

<DD>

Perintah ini digunakan untuk membuat teks atau sebuah paragraph agak masuk ke dalam.

Sintaks : <DD>

BASEFONT

Perintah ini digunakan untuk mengubah ukuran font.

Contoh :

<HTML>
<HEAD><TITLE> </TITLE></HEAD>
<BODY>

<BASEFONT SIZE=6>

Teks dengan ukuran 6 pt<BR>

<B>Teks dengan ukuran 6 pt dan tebal</B>

<BASEFONT SIZE=10>

<BR>

Teks dengan ukuran 10 pt

</BODY>
</HTML>

FONT

Juga untuk mengubah ukuran font, tetapi angka yang terdapat dalam SIZE yang merupkan ukuran font harus diberi tanda kutip.

FACE

Untuk mengubah jenis font

Contoh :

<HTML>
<HEAD><TITLE> </TITLE>
</HEAD>
<BODY>

<FONT SIZE =”6” FACE=”Times New Roman”>

Teks dengan jenis font Times New Roman.
<FONT SIZE =”6” FACE=”Arial”>


Teks dengan jenis font Arial.

</BODY>


</HTML>

<SUP>


Perintah ini digunakan untuk membuat cetak naik suatu teks.


Contoh :


<HTML>


<HEAD><TITLE> </TITLE>


</HEAD>


<BODY>

Kami adalah yang pertama : 1<SUP>st</SUP> in the world.

</BODY>


</HTML>

<SUB>


Perintah ini digunakan untuk membuat cetak turun suatu teks.


Contoh :


<HTML>


<HEAD><TITLE> </TITLE></HEAD>


<BODY>

H<SUB>2</SUB>O (disebut air(

</BODY>


</HTML>

<UL>


Perintah <UL> (Unordered List) adalah perintah untuk membuat daftar (list).

<LI>


Perintah <LI> (List Item) adalah perintah untuk membuat daftar (list)


CATATAN : Perintah <LI> harus berada dalam perintah OL, UL, DIR, MENU.

Contoh :


<HTML>


<HEAD><TITLE> </TITLE>


</HEAD>


<BODY>

<UL>


<LI>


<H2>JAWA TIMUR</H2>


<UL>


<LI>SURABAYA</LI>


<LI>MALANG</LI>


<LI>GRESIK</LI>


</UL>


</LI>


<BR>


<LI>


<H2>JAWA BARAT</H2>


<UL>


<LI>BANDUNG</LI>


<LI>SUKABUMI</LI>


<LI>BOGOR</LI>


</UL>


</LI>


</BODY>


</HTML>

BODY

<BODY … </BODY>

Perintah BODY adalah perintah untuk membuat warna latar belakang pada layar, mengubah warna link, mengubah warna dasar link, menampilkan pesan ketika halaman ditutup, dan lain-lain sesuai dengan atribut yang diberikan. Sedangkan BODY memiliki 8 atribut, antara lain :

TEXT=warna

Untuk menentukan warna teks.

BGCOLOR=warna

Untuk mengubah warna dasar layar (halaman).

BACKGROUND=URL

Untuk mengatur warna latar belakang gambar.

LINK=warna

Untuk menentukan warna link.

ALINK=warna

Untuk menentukan warna link yang sedang dipilih.

VLINK=warna

Untuk menentukan warna link yang sudah dikunjungi.

ONLOAD=string

Perintah yang akan dilaksanakan ketika halaman Website selesai di Download

ONUNLOAD=string

Perintah yang akan dilaksanakan ketika halaman Website ditutup.
Contoh :

<BODY BGCOLOR=”#FFFFFF” TEXT=”#000000” LINK=”#0000FF” VLINK=”#800080”>
<BODY ONUNLOAD=”window.alert(‘Terima kasih!’)”>

INPUT

<INPUT>

Adalah perintah untuk meminta memasukan (input) dari pengunjung, sedangkan INPUT memiliki cukup banyak atribut, antara lain:
TYPE=[text | password | checkbox | radio | submit | reset | file | hidden | image | button] (jenis input)
NAME=string (kunci dalam form submit)
VALUE=string (nilai dari input)
CHECKED (tombol check radio atau checkbox)
SIZE=number(panjang kotak teks)
MAXLENGHT=number (panjang karakter)
SCR=URL (lokasi URL atau gambar)
ALT=string (keterangan untuk gambar)
ALIGN=[top | middle | bottom | left | right] (pengaturan teks atau gambar)
DISABLED (menyembunyikan elemen)
READONLY (mencegah perubahan)
ACCEPT=string (media untuk upload file)
ACCESSKEY=character (tombol shortcut)
TABINDEX=number (posisi tab)
ONFOCUS=string (kotak teks yang menerima fokus / kursor)
ONBLUR=string (kotak teks yang ditinggalkan focus / kursor)
ONSELECT=string (teks yang dipilih)
ONCHANGE=string (nilai yang akan diganti)
ONCLICK=string (perintah yang akan dilaksanakan apabila tombol di klik)

Contoh :

Program 1

<HTML>
<HEAD>
<TITLE></TITLE>
</HEAD>
<BODY BGCOLOR=”#FFFFFF” TEXT=”#000000″ LINK=”#0000FF” VLINK=”#800080″>
<p> <label accesskey=u>Nama Anda: <input type=”text” name=”username” size=”20″ maxlength=”30″></label></p>
<p> <label accesskey=p>Password: <input type=”password” name=”pw” size=”20″ maxlength=”20″></label></p>
</BODY>
</HTML>

Program 2

<HTML>
<HEAD>
<TITLE></TITLE>
</HEAD>
<BODY BGCOLOR=”#FFFFFF” TEXT=”#000000″ LINK=”#0000FF” VLINK=”#800080″>
<p> Silahkan pilih jenis pembayaran Anda :</p>
<p><label accesskey=c><input type=”radio” name=”jenis pembayaran” value=”master card” checked>Master card </label><br>
<p><label accesskey=d><input type=”radio” name=”jenis pembayaran” value=”visa card” checked>Visa card </label><br>
<p><label accesskey=m><input type=”radio” name=”jenis pembayaran” value=”wesel pos” checked>Wesel pos </label><br>
<p><label accesskey=s><input type=”checkbox” name=”kirim” value=”yes” checked>Kirim vie e-mail </label><br>
</BODY>
</HTML>

FORM

<FORM> </FORM>

Perintah FORM adalah suatu metode untuk membuat format input seperti formulir, dan terdiri dari beberapa atribut:

ACTION=URL

Penanganan form

METHOD=[get | post]

Metode HTTP untuk submit form.

ENCTYPE=string

Tipe isi submit form.

TARGET=string

Target berupa jendela atau frame.

ONSUBMIT=string

From yang sudah di-Submit.

ONRESET=string

Form yang di-reset.

Contoh :


<HTML>


<HEAD>


<TITLE></TITLE>


</HEAD>


<BODY BGCOLOR=”#FFFFFF” TEXT=”#000000″ LINK=”#0000FF” VLINK=”#800080″>

<form>


<p>


1:<INPUT type=”radio” NAME=”radio” value=”Anda Memilih Nomor ” onclick=”alert(Value)”>
2:<INPUT type=”radio” NAME=”radio” value=”Anda Memilih Nomor ” onclick=”alert(Value)”>
3:<INPUT type=”radio” NAME=”radio” value=”Anda Memilih Nomor ” onclick=”alert(Value)”>

</form>

</BODY>

</HTML>

LABEL

<LABEL> </LABEL>


adalah suatu perintah untuk membuat keterangan field (kotak input) dalam pembuatan form, dan umumnya digunakan dengan perintah INPUT. Sedangkan LABEL terdiri dari beberapa atribut :

ACCESSKEY=character

Tombol shortcut.

ONFOCUS=script

Elemen yang menerima fokus (kursor)


ONBLUR=script

Elemen yang ditinggalkan fokus (kursor).

Contoh :

<HTML>

<HEAD>

<TITLE></TITLE>

</HEAD>

<BODY BGCOLOR=”#FFFFFF” TEXT=”#000000″ LINK=”#0000FF” VLINK=”#800080″>

<p>

<label accesskey=U>Nama Anda :

<input type=”text” name=”username” size=”20″ maxlength=”15″></label>

</p>
<p>

<label accesskey=P>Password :

<input type=”password” name=”pw” size=”20″ maxlength=”20″></label>

</p>

</BODY>

</HTML>

TEXTAREA
<TEXTAREA> </TEXTAREA>

adalah suatu perintah untuk membuat pengunjung dapat mengetik sekumpulan teks dalam sebuah kotak. Atribut yang dapat digunakan dengan perintah TEXTAREA adalah sebagai berikut :
NAME=string (kunci untuk submit form)
ROW=number (jumlah baris)
COLS=number (jumlah kolom)
DISABLE=menyembunyikan elemen
READONLY=mencegah perubahan
ACCESSKEY=character (tombol shortcut)
TABINDEX=number (posisi tab)
ONFOCUS=string (kotak teks yang menerima fokus/kursor)
ONBLUR=string (kotak teks yang ditinggalkan focus/kursor)
ONSELECT=string (teks yang dipilih)
ONCHANGE=string (nilai yang akan diganti)

Contoh :

<HTML>

<HEAD>

<TITLE></TITLE>

</HEAD>

<BODY BGCOLOR=”#FFFFFF” TEXT=”#000000″ LINK=”#0000FF” VLINK=”#800080″>

<p>

<label accesskey=C>

Ketik pesan Anda dalam kotak di bawah ini : <br>

<textarea name=”komentar” cols=”50″ rows=”8″> </textarea>

</label>

</p>

</BODY>

</HTML>

FIELDSET

<FIELDSET> </FIELDSET>

adalah suatu perintah untuk membuat beberapa formulir yang terdiri dari beberapa bagian:

PEMBUATAN MENU

<SELECT> </SELECT>

Perintah ini digunakan untuk membuat daftar menu pilihan (options selector), dan umumnya digunakan dengan perintah OPTIONS (pembuat menu pilihan) dan OPTGROUP (pembuat group pilihan). Dengan perintah ini maka Anda akan dapat membuat daftar pilihan seperti yang sering Anda lihat dalam Website professional:

ATRIBUT :
NAME=string (kunci untuk submit form)
MULTIPLE=dapat membuat menu pilihan berganda
SIZE=number (jumlah pilihan yang tampak)
DISABLE=menyembunyikan elemen
TABINDEX=number (posisi tab)
ONFOCUS=string (kotak teks yang menerima fokus/kursor)
ONBLUR=string (kotak teks yang ditinggalkan focus/kursor)
ONCHANGE=string (nilai yang akan diganti)

<OPTIONS> </OPTIONS>

Perintah ini untuk membuat menu pilihan, dan umumnya digunakan dengan perintah kontrol SELECT :

ATRIBUT :
VALUE=string (nilai pilihan)
SELECTED=pilihan berupa inisial
DISABLE=menyembunyikan pilihan
LABEL=string (pilihan label)

Contoh :

<HTML>

<HEAD>

<TITLE></TITLE>

</HEAD>

<BODY BGCOLOR=”#FFFFFF” TEXT=”#000000″ LINK=”#0000FF” VLINK=”#800080″>

Pilih status perkawinan Anda :

<select name=”status”>

<option selected value=”">Status … </option>

<option> Belum kawin </option>

<option> kawin </option>

<option> Janda </option>

<option> Duda </option>

</select>

</BODY>

</HTML>

STYLE

<STYLE> </STYLE>

adalah perintah untuk memasukan (embedding) stylr sheet, misalnya untuk penanganan warna latar belakang halaman (background).

ATRIBUT :
TYPE=string(harus “text/css”)
MEDIA=MediaDesc (jenis media yang akan dimasukan)
TITLE=strings (judul style sheet)

Contoh :

<HTML>

<HEAD>

<TITLE></TITLE>

<META name=”description” content=”">

<META name=”keywords” content=”">

<META name=”generator” content=”CuteHTML”>

</HEAD>

<font color=”white”><h1> Selamat datang ke Websiteku. </h1> </font>

<style type=”text/css” media=screen>

BODY {background: red; color:black }

</style>

</BODY>

</HTML>

KETERANGAN
<FONT COLOR=WHITE>

Perintah ini untuk membuat warna teks (foreground) dengan warna putih. Jika ingin warna lain, misalnya merah, ganti dengan RED.
BODY { background: red; color:black}

Perintah untuk membuat warna latar belakang halaman Website, jika ingin warna aqua misalnya, ganti red dengan aqua.

TABEL & KOTAK

Perintah-perintah yang termasuk ke dalam kategori TABEL adalah sebagai berikut :
TABLE
CAPTION
COLGROUP
COL – Table Column
THEAD – Table Head
TFOOT – Table Foot
TBODY – Table Body
TR – Table Row
TTD – Table Data Cell
TH – Table Header Cell

<TABLE> </TABLE>

Perintah untuk membuat table. Dan terdiri dari beberapa atribut:
SUMMARY=string (struktur table)
WIDTH=length (lebar table)
BORDER=pixels (lebar border)
FRAME=[void | above | hsides | lhs | rhs | vsides | box | border] (bagian luar border)
RULES=[none | groups | row | cols | all] (bagian dalam border)
CELLSPACING=length (spasi antara cell)
CELLPADDING=length (spasi dalam cell)
ALIGN=[left | center | right] (perata tabel)
BGCOLOR=color (warna background table)

Contoh :

<HTML>
<HEAD>
<TITLE></TITLE>
</HEAD>
<BODY BGCOLOR=”#FFFFFF” TEXT=”#000000″ LINK=”#0000FF” VLINK=”#800080″>
<table>
<tr align=”left”>
<th scope=”col”>Nama</th>
<th scope=”col”>Umur</th>
<th scope=”col”>Alamat</th>
</tr>

<tr align=”left”>

<td>Hans </td>

<td>22 </td>

<td>Paingan </td>

</tr>

</table>

</BODY>

</HTML>


MEMBUAT KOTAK

Contoh :

<HTML>

<HEAD>

<TITLE></TITLE>

</HEAD>

<BODY BGCOLOR=”#FFFFFF” TEXT=”#000000″ LINK=”#0000FF” VLINK=”#800080″>

<table width=”400″ cellspacing=”0″ cellpadding=”5″ border=”2″>

<tr>

<td width=”400″ bgcolor=”#ffcb10″>

<font size=”2″ face=”MS Sans Serif”>

Kalimat biasa dalam kotak <br>

<b>Kalimat tebal dalam kotak</b> <br>

<i>Kalimat miring dalam kotak</i> <br>

</tr>

</table>

</BODY>

</HTML>

MEMBUAT TABLE & KOTAK

Contoh :

<HTML>

<HEAD>

<TITLE></TITLE>

</HEAD>


<BODY BGCOLOR=”#FFFFFF” TEXT=”#000000″ LINK=”#0000FF” VLINK=”#800080″>

<table width=”544″ cellspacing=”0″ cellpadding=”5″ border=”2″>

<tr align=”left”>

<th scope=”col”>Nama</th>

<th scope=”col”>Umur</th>

<th scope=”col”>Alamat</th>

</tr>

<tr align=”left”>

<td>Hans </td>

<td>22 </td>

<td>Paingan </td>

</tr>

</table>

</BODY>

</HTML>


WARNA

FONT COLOR
Perintah untuk memasukan warna kedalam teks.

Contoh :

<HTML>

<HEAD>

<TITLE></TITLE>

</HEAD>

<BODY BGCOLOR=”#FFFFFF” TEXT=”#000000″ LINK=”#0000FF” VLINK=”#800080″>

<basefont size=”6″>

<b>

<font color=”red”>Teks dengan warna merah</font><br>

<font color=”black”>Teks dengan warna hitam</font><br>

<font color=”blue”>Teks dengan warna biru</font>

</b>

</BODY>

</HTML>

BACKGROUND
Adalah perintah untuk membuat warna latar belakang sebuah teks.

KODE-KODE WARNA UNTUK WARNA BACKGROUND

#000000 : Black

#c0c0c0 : Silver

#808080 : Gray

#ffffff : White

#800000 : Maroon

#ff0000 : Red

#800080 : Purple

#ff00ff : Fuchsia

#008000 : Green

#00ff00 : Lime

#808000 : Olive

#ffff00 : Yellow

#000080 : Navy

#0000ff : Blue

#008080 : Teal

#00ffff : Aqua

Contoh :

<HTML>
<HEAD>
<TITLE></TITLE>

</HEAD>

<BODY BGCOLOR=”#FFFFFF” TEXT=”#000000″ LINK=”#0000FF” VLINK=”#800080″>
<table cellpadding=”5″ cellspacing=”5″>

<td style=”BACKGROUND: #000000; COLOR: white”>Dasar Hitam </td>

<td style=”BACKGROUND: #ff0000; COLOR: white”>Dasar Merah </td>

</table>

</BODY>


</HTML>

GAMBAR & MUSIK

Perintah-perintah untuk memasukan GAMBAR & MUSIK adalah sebagai berikut :
IMG SRC : Untuk memasukan gambar ke dalam Website
IMG BORDER : Untuk membuat bingkai gambar dengan kotak
BGSOUND : Untuk memasukkan suara atau musik ke dalam Website Anda.

IMG SRC
Adalah perintah untuk memasukkan gambar ke dalam Website. Anda dapat memasukkan gambar yang berakhiran (berformat) .JPG, .GIF, .BMP dan lain-lain. Untuk kemudahan pengiriman gambar kelak ke dalam server, satukan terlebih dahulu gambar ke dalam folder program. Barulah panggil ke dalam program.

Sintaks : <IMG SRC=”lokasi gambar”>

IMG BORDER

Untuk membingkai gambar dengan kotak

Sintaks : <IMG BORDER=”5

Angka 5 adalah ukuran border (bingkai), ganti angka ini sesuai dengan ukuran border yang Anda inginkan.

BGSOUND

Perintah ini untuk memasukan suara atau musik ke dalam Website Anda.


Sintaks : <BGSOUND loop=infinite SCR=”Lokasi File”>


PERHATIAN : Ukuran file musik yang sangat besar (misalnya MP3), tidak dapat kita masukkan ke dalam Website kita. Karena nanti kita tidak dapat memindahkannya ke dalam server agar dapat diakses pemakai internet, karena ukurannya sangat besar, akan keluar pernyataan kehabisan waktu ketika kita memindahkannya ke dalam server.

FRAME


Adalah suatu fasilitas dalam HTML yang berfungsi untuk membagi layar ke dalam beberapa jendela. Ada pun perintah-perintah untuk membuat frame dalam HTML adalah sebagai berikut:
FRAMESET
FRAME
IFRAME

<FRAMESET> </FRAMESET>


Adalah perintah untuk membuat frame, dan umumnya berpasangan dengan perintah FRAME. Atribut untuk FRAMESET :
ROWS=length (panjang baris dalam satuan pixel)
COLS=length (panjang kolom dalam satuan pixel)
ONLOAD=string (semua frame sudah selesai di-load)
ONUNLOAD=string (semua frame sudah dihapus)

Contoh :
<FRAMESET COLS=”lebar jendela bagian kiri, lebar jendela bagian kanan”>
<FRAME COLS=”*,*”>
<FRAME ROWS=”*,*”>

FRAME


Perintah ini untuk memasukan gambar, halaman atau URL ke dalam jendela (frame), mengatur margin, menggulung frame dan lain-lain. FRAME terdiri dari beberapa atribut, antara lain :
NAME=string (nama frame)
SRC=URL (isi frame)
LONGDESC=URL (uraian dari frame)
FRAMEBORDER=[1 | 0] (border frame)
MARGINWIDTH=pixels (batas kiri terhadap ini frame)
MARGINHEIGHT=pixels (batas atas terhadap ini frame)
NORESIZE
SCROLLING=[yes | no | auto] (penggulung frame)

Contoh :


<FRAME SRC=”link” NAME=”nama”


SCROLLING=”auto” MARGINWIDTH=1 MARGINHEIGHT=1


NORESIZE>


Keterangan :


Untuk pembuatan FRAME perintah <BODY> tidak digunakan dalam program, karena jika ada perintah <BODY> maka program ini tidak dapat berjalan.

IFRAME SRC


Adalah perintah untuk membuat jendela dengan lebar dan tinggi sesuai dengan keinginan programmer, dan dapat diletakan di bagian kiri, tengah, atau bagian kanan.

Sintaks :


<IFRAME SRC=”link” WITDH=400 HEIGHT=105></IFRAME>

Contoh :


<HTML>


<HEAD>


<TITLE></TITLE>


</HEAD>


<BODY BGCOLOR=”#FFFFFF” TEXT=”#000000″ LINK=”#0000FF” VLINK=”#800080″>

<p align=”center”>

<iframe src=”link” WIDTH=400 HEIGHT=90>

</iframe> </p>

<p align=”center”>

<img src=”link”></p>

</BODY>
</HTML>

A HREF

<A HREF

Adalah perintah HTML untuk membuat LINK (membuka sebuah halam atau URL dari sebuah halaman). Ada pun atribut yang dapat digunakan dengan HREF adalah sebagai berikut:
ONCLICK : Membuka link setelah tombol di-klik
ONMOUSEOVER : Membuka link hanya dengan menyorot tombol
ONMOUSEOUT : Membuka link hanya dengan menyorot tombol, dan kembali kehalaman semula apabila mouse dijauhkan dari link.

Sintaks:

<A HREF=”gambar atau halaman atau URL”> Nama Link</A>

CARA PEMBERIAN NAMA FILE

Untuk menjaga kesalahan, berilah nama file dengan ketentuan sebagai berikut:
File pertama (file induk) simpan dengan nama index.html (semua huruf kecil)
File-file berikutnya juga disimpan dengan huruf kecil.
Tentang file gambar, juga disimpan dengan huruf kecil.
Jika nama file lebih dari satu kata, pisahkan dengan underscore ( _ ).

Sumber :Modul MR. HANDRI SUNJAYA

.

.

.

.
Design by BlogSpotDesign | Ngetik Dot Com