Maybe my friend is no stranger to listen to the words of people about How To Install Windows 7 with a stick. But my friend does not know how or maybe my friend does not want to know, which is important atai laptop netbook OS already installed his friend. Need friend know, science is very expensive you know, it emang bener. Well, of course, especially for my friend who has a netbook or laptop, it's good to know How To Install Windows 7 with a stick. This is very important, considering the money we spent if the OS is broken, but only takes a few minutes to install the OS on a netbook or a laptop, depending on the computer spec.
HOW TO INSTALL WINDOWS 7 WITH FLASH
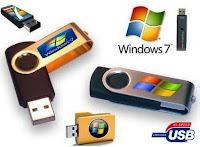
This method is actually used for the netbook with no CD or DVD-ROOM, but the use of flash is much easier and can reduce the risk of failure in the installation process. Although we have been there on PC DVD-ROOM, no one we use for installation Flshdisk because in addition to more convenient and simple, the risk of failure we can also minimalisirkan.
However, before I will briefly describe the advantages and disadvantages of windows 7:
Advantages:
1.The boot / shutdown faster
2.Power consumption CPU, hard disk (HD) and system memory required fewer service
3.Prefetching optimizes both for HD and SSD
4.Better view in terms of three prominent demensinya
5.Features sekurity really tight.
Weaknesses / Cons:
1.Some applications can not operate on Windows 7
2.Bug in Windows Media Player 12
3.There is hardware that can be immediately recognized in Vista, but not in Windows 7
4.Difficult to force the software that previously could be forced to install on Vista, also installed in Windows XP
Well, if my friend already knows everything, then we proceed to the installation phase of Windows 7 OS.
The first step is to do my friend Download : Tool Install Windows 7 Via Flashdisk
Needed for the next Install Windows 7 via flash are:
1.FlashDisk with a minimum capacity of 4 GB depending on who you use windows 7.
2.Master Windows 7
3.Software WinToFlash.
4.ROOM DVD as a media master copy of Windows 7. [Not optimal]
Furthermore, the process of making a bootable Windows 7 USB Drive can be started with the following steps:
1. Insert your Windows 7 DVD
2. Open the Windows WinToFlash 7.rar and click on the file 2x WinToFlash.exe
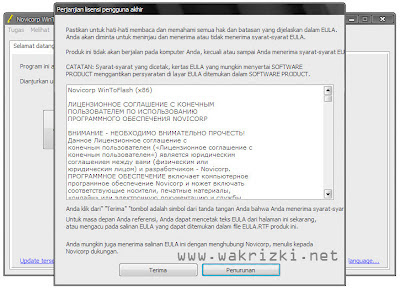
3. Next will come out look like below and click Accept
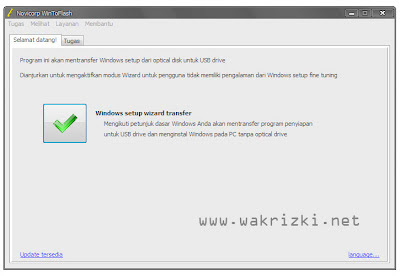
4. In the view below please click the button " Checklist "Windows setup wizart transverse
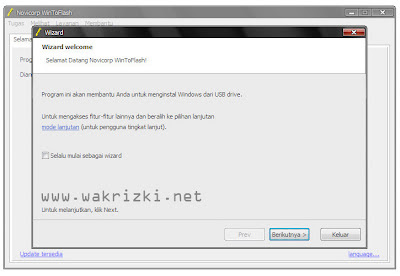
5. In the view below please click the " Next » "
6. In the view below, there are two options:
- In the Windows file path please select the source OS Windows 7
- On the USB drive please select FlashDisk to be used for the installation of OS Windows 7
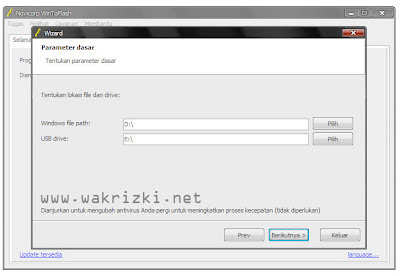
8. Next select accept the terms and click continue.
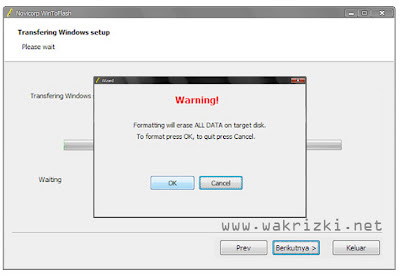
9. If there is a warning to FlashDisk format and click Ok
10. WinToFlash will transfer the installation file to FlashDisk windows and it was rather a long process so be patient waiting for him. After the transfer is complete click the Next and Exit
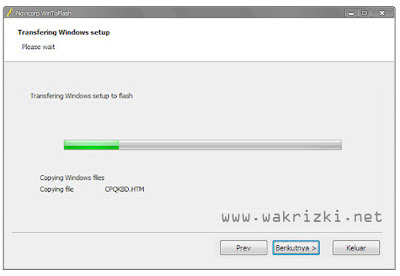
Early stage to make a bootable Windows 7 USB drive we've done, then we will install Windows 7 with a stick as a device.
HOW TO INSTALL WINDOWS 7 WITH FLASH
1. The first step you should do is make sure my friend from my friend in the computer BIOS boot setting for 1st Boot Device options are Removable Dev. or USB. Drive . How, when the computer has restarted and we will come back to life, immediately press the Delete and the tab Startup 1st Boot Device to select Removable Dev. or USB. Drive . After that press the F10 to save and exit. Not all PC or Netbook have to do the settings like this. Most Netbooks now be automated if we plug in a USB Boot.
2. Then press any key to boot usb.
3. You should see the image as below:

4. Select Indonesia on Language, time, currency, and location

5. Press the Install Now

6. Wait a few moments of this process.

7. Check the I accept the license terms for the approval of the use of windows 7 and then click Next

8. Just select Custom (advanced) to select the drive where Windows 7 will be installed

9. My friend can set up partitions on the drive at the same time this step, I recommend at least 2 buddies divide the hard disk drive, one to drive for windows 7 (C) and one drive for data (D) by selecting the drive option, or just press the next will mate with the assumption partition the hard disk after installation of windows 7 is complete.

10. Wait until the process is complete


11. Windows will automatically restart.

12. After the restart will appear below the image.

13. Wait for the process of setting up the services are just a few moments.

14. Installation will proceed automatically.

15. Enter your User Name and Computer Name mate at will.

16. If you need to type the password passtwordnya 2 times or empty it if my friend does not want mempassword user friend.

17. Enter the product key serial number windows 7 activation friend or leave blank to delete it after installation and ceklisnya.

18. Choose the level of security protection from Microsoft.

19. Set the time zone buddy (for Indonesia +7 from GMT).

20. Set the type of network buddies are using. (If connected to the internet)

21. Wait a few moments to set up a configuration that has been my friend set up.

22. Congratulations, pal windows 7 ready for use.

Hopefully this short tutorial on How To Install Windows 7 with a flash is useful for readers pal.
Source-komputer.com tips


0 comments:
Post a Comment